Lucky Charms Bars: 5 Best Recipes for Magical Treats!

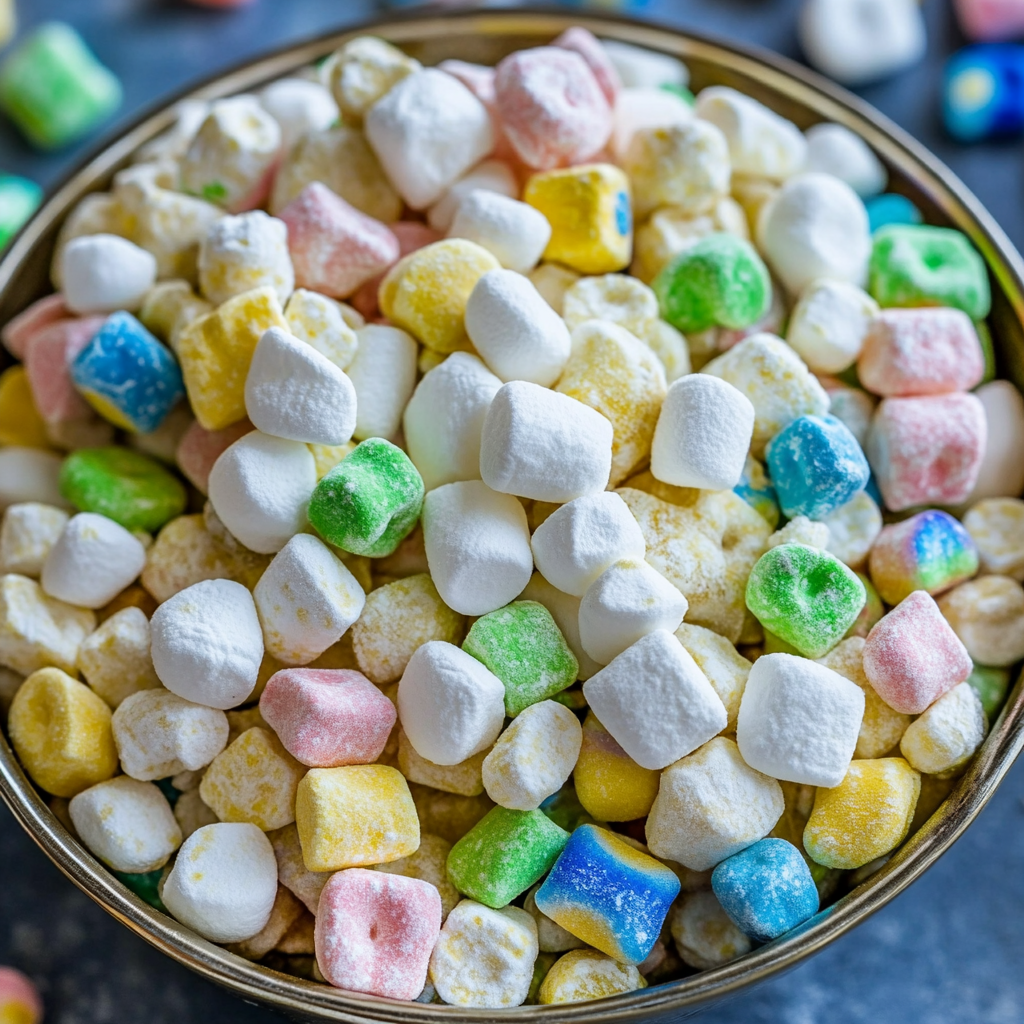
Lucky Charms bars are the ultimate no-bake treat, combining the nostalgic crunch of cereal with the creamy sweetness of marshmallows. Perfect for parties, quick snacks, or even a fun dessert, these bars bring instant joy with every bite. Whether you’re making them for kids or just indulging your inner child, their vibrant colors and irresistible texture make them a crowd-pleaser. Plus, they’re so easy to whip up—no oven required! If you love simple yet magical desserts, you’ll adore this easy-to-make recipe.
These no-bake lucky charms bars come together in just 20 minutes from start to finish! Here’s the breakdown:
Perfect for last-minute treats or when you need a quick dessert fix. For more fast recipes, check out our easy casserole collection.
Before starting, ensure you have all the ingredients measured and ready. This includes marshmallows, butter, Lucky Charms cereal, and any optional add-ins like chocolate chips or sprinkles.
In a large saucepan, melt the butter over low heat. Once melted, add the marshmallows and stir continuously until fully melted and smooth. Be careful not to burn the mixture.
Remove the saucepan from heat and quickly stir in the Lucky Charms cereal. Ensure every piece is evenly coated with the marshmallow mixture for the best texture.
Transfer the mixture to a greased or parchment-lined baking dish. Use a spatula or your hands (lightly greased) to press it firmly into an even layer.
Allow the bars to cool at room temperature for at least 30 minutes, or refrigerate for 15 minutes to speed up the process. Once set, cut into squares and enjoy!
Lucky Charms bars are a fun, nostalgic treat, but they’re not the most nutritious option. A typical serving contains around 150–200 calories, with 5–8 grams of fat, 25–30 grams of carbs, and 2–3 grams of protein. The marshmallows add sugar, while the cereal provides some fiber. For a healthier twist, try using whole-grain cereal or reducing the marshmallow quantity. If you’re looking for balanced snacks, check out these protein-packed meal ideas or nutrient-dense recipes. For more insights on sugar alternatives, explore healthier dessert swaps or low-sugar snack inspirations.
Yes! You can easily tweak this no-bake treat to make it healthier without sacrificing flavor. Here are some smart swaps:
For more healthy dessert inspiration, check out our cauliflower fried rice recipe that proves healthy can be delicious. You might also enjoy these ground turkey recipes for protein-packed meals.
External resources like The Stay at Home Chef offer great tips for healthier cooking methods. For more dessert ideas, The Dizzy Cook has wonderful vegan options.
These colorful Lucky Charms bars are perfect for parties, after-school snacks, or a fun dessert. For a festive touch, drizzle melted white chocolate on top or sprinkle extra marshmallows. Pair them with a cold glass of milk or a scoop of vanilla ice cream for an extra treat.
If you’re serving these at a party, try arranging them on a platter with other bite-sized desserts like cheesy baked burrito rice or Texas toast sloppy joes for a sweet and savory spread. For a themed dessert table, check out these pumpkin cheesecake and pecan sandies for more inspiration.
Kids will love helping decorate these bars—set up a topping station with mini marshmallows, sprinkles, or crushed cereal for a fun DIY dessert experience!
Making lucky charms bars is simple, but a few missteps can ruin their magic. Here’s what to watch out for:
Burnt marshmallows make bars hard and bitter. Melt them on low heat, stirring constantly. For foolproof results, try this low-and-slow technique adapted from other no-bake treats.
Butter prevents sticky bars. Don’t substitute oil—it changes the texture. If you need a dairy-free version, use high-quality vegan butter like in these cheesy baked recipes.
Crushing the cereal removes its crunch. Gently fold in the lucky charms to preserve the marshmallow fluffiness. For perfect layering, take inspiration from quick-mix dishes.
Impatient slicing causes messy edges. Chill for at least 2 hours—or follow our make-ahead tips for stress-free prep. Pro tip: Use a warm knife for cleaner cuts.
These bars soften quickly. Keep them refrigerated in an airtight container, similar to how you’d store cream-based desserts.
To keep your lucky charms bars fresh and chewy, store them in an airtight container at room temperature for up to 3 days. For longer storage, wrap them tightly in plastic wrap and freeze for up to 2 months. When ready to enjoy, thaw at room temperature or warm them slightly in the microwave for 10-15 seconds. For more tips on preserving desserts, check out these whipped cream storage tricks or learn how to freeze cheesecake properly. If you love no-bake treats, explore our cheesy baked burrito rice or authentic gumbo recipes for more make-ahead meal ideas.
These no-bake magic bars are the perfect way to bring instant joy to any occasion. Whether you’re prepping for a party, satisfying a sweet craving, or looking for a fun kitchen project with kids, lucky charms bars deliver every time. Their colorful charm and creamy texture make them irresistible—plus, they come together in minutes!
If you loved this recipe, check out more crowd-pleasing treats like our cheesy baked burrito rice or authentic gumbo recipes for savory balance. For another no-bake delight, explore our chicken cauliflower fried rice or dive into ground turkey recipes for protein-packed meals. Happy baking—or in this case, no baking!
Yes! While Lucky Charms give these bars their signature charm, you can substitute with other marshmallow cereals or even plain cereal mixed with mini marshmallows.
When stored properly in an airtight container, these treats stay fresh for up to 5 days at room temperature or 2 weeks in the refrigerator.
Absolutely! Just use gluten-free Lucky Charms or another gluten-free marshmallow cereal to make this recipe suitable for gluten-sensitive diets.
Texture issues usually come from improper marshmallow melting. For perfect consistency, melt marshmallows slowly over low heat and mix thoroughly with the cereal.
Definitely! Many people enjoy adding chocolate chips, peanut butter, or sprinkles to customize their Lucky Charms bars.
Yes, these no-bake bars are perfect for school events as they’re nut-free (unless you add them) and easy to transport in individual portions.
Welcome to Tasty Fresh Recipes, your home for easy, healthy, and flavorful dishes.
© Tastyfreshrecipes.com • 2025 All rights reserved