Crispy Mooli Paratha Recipe: Punjabi Daikon Radish Stuffed Flatbread

Laura
Laura • Apr 4, 2026
Crispy Mooli Paratha Recipe: Punjabi Daikon Radish Stuffed Flatbread
Follow Us

This mooli paratha recipe creates a classic Punjabi breakfast with a five ingredient daikon radish filling. My method skips the common pitfalls, guaranteeing flaky, non-soggy results your first time.

I still think my mom’s version is the best. There’s something about the contrast between the crispy, golden paratha exterior and that tender, slightly spicy mooli filling that I find completely irresistible.

It’s a textural masterpiece in a flatbread.

For the uninitiated, imagine a savory scallion pancake but with robust, warming Indian spices. They are soft, they are crispy, and they are deeply craveworthy.

If working with atta dough is new territory, my detailed paratha guide covers all the essential techniques for success.

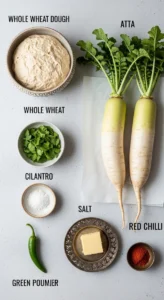
Every ingredient here pulls double duty, balancing the spicy, sharp mooli with fresh herbs and a sturdy dough that can handle the moisture. Get these right and the parathas come together without a fight.

CLN_01_S02_I01_SECTION_02_IMAGE_1.webp
  • Daikon or White Radish (Mooli): This long white radish is essential for the classic mooli paratha flavor. It offers a sharp, peppery kick that mellows and sweetens beautifully when cooked. Find it in the produce section of most Asian or South Asian grocery stores, especially during the winter months. I always pick the firmest, heaviest ones I can find.
  • Cilantro leaves and tender stems: Weighing it in grams ensures you get the right amount of fresh, herbaceous flavor every time. The stems pack just as much punch as the leaves, so don’t waste them. It really cuts through the richness of the fried bread.
  • Green chili pepper (Indian finger Chili or Serrano): This is your heat control. Serrano chilis are typically spicier, so deseeding them is a good move if you want less fire. A larger chili gives more flavor without overwhelming heat, which I personally prefer.
  • Prepared atta dough: A double batch of my atta recipe is perfect for this. Using dough that is firm and at room temperature is non-negotiable. The radish filling will inevitably release more water as you work, so a drier, sturdier dough is your best defense against a sticky mess.

Mastering a perfect mooli paratha recipe is about one thing: keeping the filling dry. This version uses a simple five ingredient stuffing, including salt, and delivers the flaky, spicy parathas you get at a Punjabi dhaba.

I learned the hard way that skipping the squeezing step leads to a soggy mess. These are the essential tips I wish I had known from the start.

A flat tawa on a gas stovetop is my usual setup for making mooli paratha, though these photos used an induction cooktop with a cast iron pan. That was a poor combination, honestly.

Thin, lightweight tawas work best on narrow induction burners, not heavy cast iron. But it did highlight three essential techniques for perfect parathas every time.

  1. Move the paratha toward the pan edges. Uneven heat or thicker dough edges can cause uneven cooking. Shifting it around the perimeter ensures everything gets that golden crispness.
  1. Fold it in half to cook the edges. Sometimes the center cooks faster than the outer rim. Folding the paratha over briefly gives those edges direct contact with the hot surface without overcooking the middle.
  1. Press firmly with a spatula all over. Focus on any pale or soft spots, especially near the edges. This pressure cooks the filling through and prevents a soggy interior. You will feel the paratha become firm and flaky under the spatula.
CLN_01_S06_I01_SECTION_06_IMAGE_1.webp
CLN_01_S06_I02_SECTION_06_IMAGE_2.webp
CLN_01_S06_I03_SECTION_06_IMAGE_3.webp
CLN_01_S06_I04_SECTION_06_IMAGE_4.webp

Crispy Mooli Paratha Recipe: Punjabi Daikon Radish Stuffed Flatbread

Learn how to make authentic mooli paratha with this easy recipe. Get crispy, flavorful Punjabi stuffed flatbreads with step-by-step tips for beginners.

Nutrition info is automatically calculated as an estimate — actual values may vary. Always check your ingredient labels for the most accurate results!

Tried this recipe?

Let us know how it was!

0 0 votes
Article Rating
Photo of author

Laura

Hi, I’m Laura, the founder of Tasty Fresh Recipes. With a small team of passionate home cooks, I create simple, comforting recipes that are easy to follow and made for real life.

Subscribe
Notify of
guest

0 Comments
Oldest
Newest Most Voted
Inline Feedbacks
View all comments
0
Would love your thoughts, please comment.x
()
x